
Stamped Chocolate Espresso Cookies Recipe
Introduction
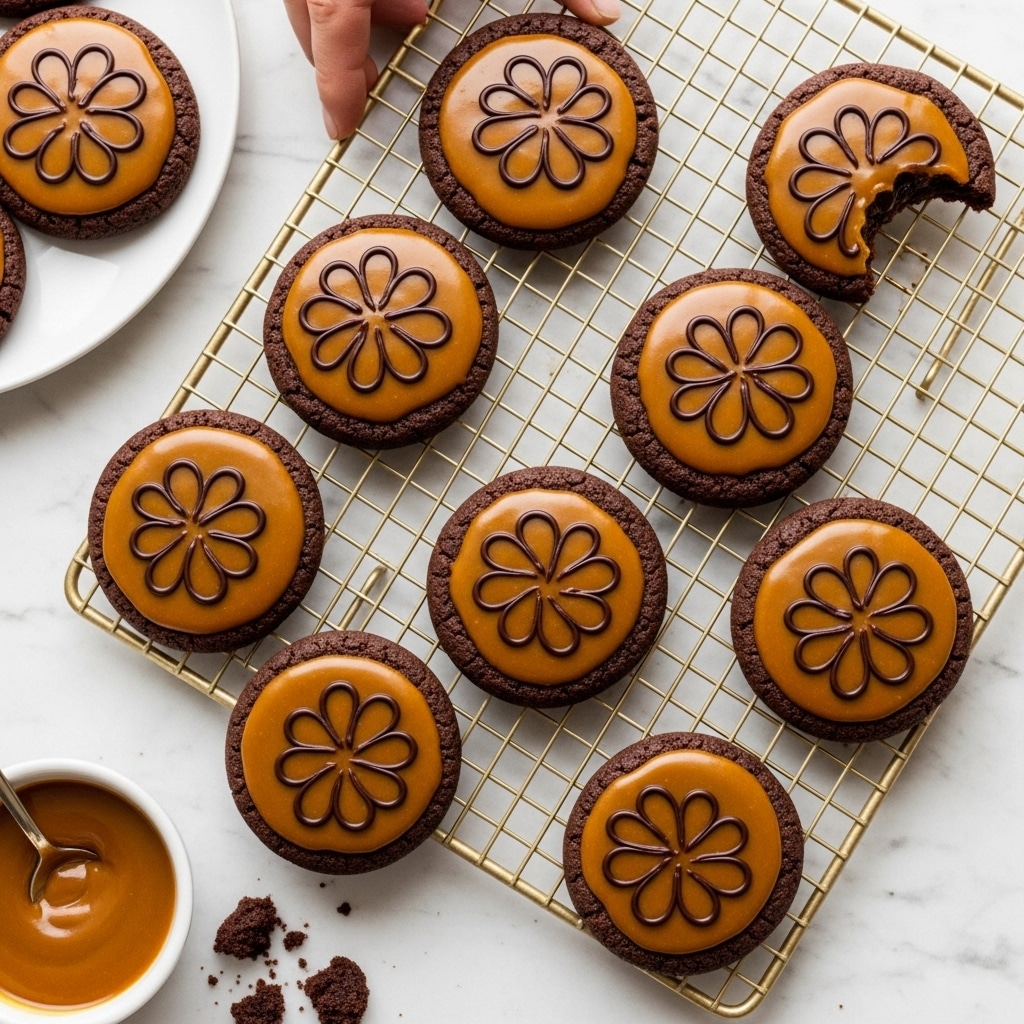
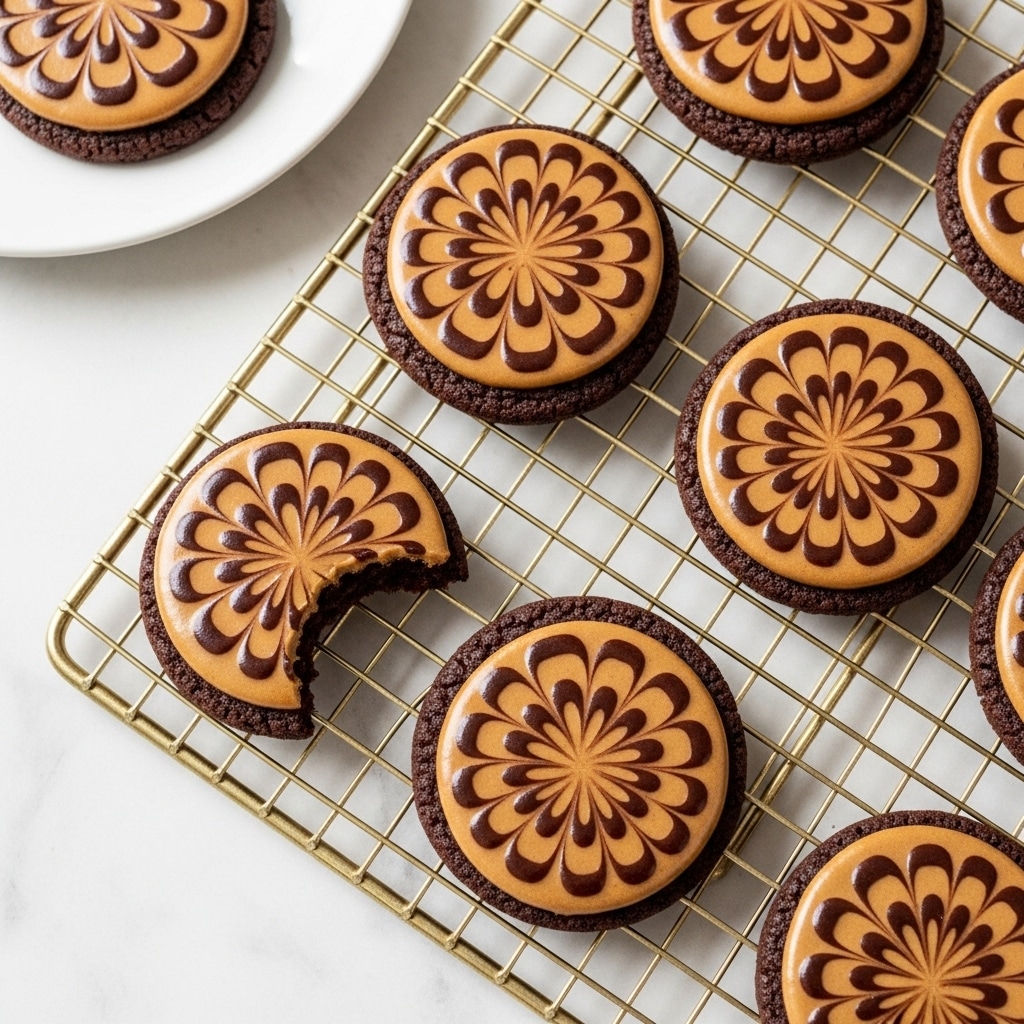
Stamped Chocolate Espresso Cookies combine rich cocoa and bold espresso flavors in a soft, beautifully embossed treat. These elegant cookies are perfect for coffee lovers looking for a sweet, sophisticated snack.
Ingredients
- 1 and 1/2 cups (188g) all-purpose flour (spooned & leveled)
- 3/4 cup (62g) unsweetened natural or Dutch-process cocoa powder, plus more as needed
- 2 teaspoons espresso powder
- 1 teaspoon baking powder
- 1/8 teaspoon salt
- 3/4 cup (12 Tbsp; 170g) unsalted butter, softened to room temperature
- 1 cup (200g) granulated sugar
- 1 large egg, at room temperature
- 1 teaspoon pure vanilla extract
- 1 teaspoon espresso powder (for glaze)
- 2 Tablespoons (30g/ml) warm water
- 1 and 1/2 cups (180g) confectioners’ sugar, sifted
- 2 Tablespoons (30g/ml) milk (dairy or nondairy)
Instructions
- Step 1: In a medium bowl, whisk together the flour, cocoa powder, espresso powder, baking powder, and salt. Set aside.
- Step 2: In a large bowl, beat the butter and granulated sugar on medium-high speed until smooth and creamy, about 3 minutes. Add the egg and vanilla extract, then beat until combined, about 1 minute. Scrape the bowl as needed to ensure even mixing.
- Step 3: Gradually add the dry ingredients to the wet ingredients and mix on low speed until combined. The dough will be soft and sticky. Cover tightly and refrigerate for at least 1 hour or up to 2 days.
- Step 4: Line baking sheets with parchment paper or silicone mats. Scoop a heaping tablespoon (about 30g) of dough per cookie and roll into balls. Arrange them 3 inches apart on the prepared sheets.
- Step 5: Press your cookie stamp firmly onto the top of each dough ball, centering it as best as possible. If the dough sticks, dust the stamp lightly with cocoa powder before pressing. Lift the stamp straight up. Optionally, brush any excess cocoa powder off the tops.
- Step 6: Refrigerate the stamped cookies for 1 hour before baking.
- Step 7: Preheat your oven to 350°F (177°C).
- Step 8: Bake the cookies until the edges are set, about 11–13 minutes. Let cool on the baking sheet for 5 minutes, then transfer to a wire rack to cool completely.
- Step 9: To make the glaze, whisk the espresso powder and warm water together until dissolved. Add the confectioners’ sugar and milk, adjusting for desired consistency. Use a pastry brush to glaze the tops of the cookies or dip the tops in the glaze. Allow the glaze to set, about 1 hour.
Tips & Variations
- Use Dutch-process cocoa for a mellower chocolate flavor, or natural cocoa for a brighter taste.
- Brush cocoa powder on your cookie stamp before pressing to prevent dough from sticking and to enhance the stamp design.
- For a stronger espresso flavor, add a bit more espresso powder to both the dough and glaze.
- Swap dairy milk for almond or oat milk in the glaze to make it dairy-free.
Storage
Store leftover cookies in an airtight container at room temperature for up to one week. The glaze will remain set and the cookies stay soft. For longer storage, freeze the cookies without glaze for up to 3 months, then thaw and glaze before serving. Reheat briefly in a warm oven if desired to refresh texture.
How to Serve
Serve this delicious recipe with your favorite sides.
FAQs
Can I make the cookie dough ahead of time?
Yes, cookie dough can be refrigerated for up to 2 days before baking. This actually helps intensify the flavors and makes the dough easier to stamp.
What if I don’t have a cookie stamp?
You can press the dough balls gently with a flat-bottomed glass or simply flatten them slightly by hand for a different look. The cookies will still taste delicious without the stamped pattern.
Print
Stamped Chocolate Espresso Cookies Recipe
- Total Time: 1 hour 33 minutes
- Yield: About 24 cookies 1x
Description
These Stamped Chocolate Espresso Cookies combine rich cocoa and bold espresso flavors in a beautiful, embossed design. Soft and chewy, they are topped with a smooth espresso glaze that adds a perfect balance of sweetness and coffee aroma. Ideal for coffee lovers and chocolate enthusiasts, these cookies are a delightful treat for any occasion.
Ingredients
Dry Ingredients
- 1 and 1/2 cups (188g) all-purpose flour (spooned & leveled)
- 3/4 cup (62g) unsweetened natural or Dutch-process cocoa powder, plus more as needed
- 2 teaspoons espresso powder
- 1 teaspoon baking powder
- 1/8 teaspoon salt
Wet Ingredients
- 3/4 cup (12 Tbsp; 170g) unsalted butter, softened to room temperature
- 1 cup (200g) granulated sugar
- 1 large egg, at room temperature
- 1 teaspoon pure vanilla extract
Glaze
- 1 teaspoon espresso powder
- 2 Tablespoons (30g/ml) warm water
- 1 and 1/2 cups (180g) confectioners’ sugar, sifted
- 2 Tablespoons (30g/ml) milk (dairy or nondairy)
Instructions
- Make the cookie dough: In a medium bowl, whisk together the flour, cocoa powder, espresso powder, baking powder, and salt. Set this dry ingredient mixture aside for now.
- Cream butter and sugar: In a large bowl using a handheld or stand mixer fitted with a paddle attachment, beat the softened butter and granulated sugar on medium-high speed until smooth and creamy, about 3 minutes. Then add the egg and vanilla extract and beat again on medium-high speed until well combined, about 1 minute. Scrape down the sides and bottom of the bowl to incorporate all ingredients evenly.
- Combine wet and dry ingredients: With the mixer on low speed, gradually add the dry ingredient mixture to the wet mixture and mix until just combined. The dough will be soft and sticky. Cover the bowl tightly and refrigerate the dough for at least 1 hour, and up to 2 days, to firm up for easier handling.
- Roll and stamp cookie dough: Prepare large baking sheets by lining them with parchment paper or silicone baking mats. Scoop a heaping tablespoon (about 30g) of chilled cookie dough per cookie and roll them into balls. Place dough balls approximately 3 inches apart on the prepared baking sheets. Center the cookie stamp over each dough ball and press firmly down, spreading the dough nearly to the edges of the stamp. Lift the stamp straight up. If the dough sticks to the stamp, brush the stamp lightly with cocoa powder to prevent sticking. Brush excess cocoa powder off the stamped cookies if needed.
- Chill the stamped cookies: Refrigerate the stamped cookie dough balls on the baking sheets for 1 hour to ensure they hold their shape during baking.
- Preheat oven: Heat your oven to 350°F (177°C) to prepare for baking.
- Bake cookies: Bake the chilled, stamped cookies for 11 to 13 minutes, or until the edges are set. Remove from the oven and allow cookies to cool on the baking sheets for 5 minutes before transferring to a wire rack to cool completely.
- Make the glaze: In a medium bowl, dissolve 1 teaspoon of espresso powder in 2 tablespoons warm water using a fork or small whisk. Whisk in the sifted confectioners’ sugar and milk until smooth. Adjust glaze consistency by adding more milk for thinner glaze or more confectioners’ sugar for thicker glaze.
- Glaze the cooled cookies: Using a pastry brush, brush the espresso glaze over the tops of the cooled cookies or dip the cookie tops into the glaze. Let the glaze set for about 1 hour.
- Store the cookies: After the glaze has set, store leftover cookies tightly covered at room temperature for up to 1 week to maintain freshness.
Notes
- Use Dutch-process cocoa powder for a smoother, less acidic chocolate flavor or natural cocoa for a more intense taste.
- Chilling the dough and then the stamped cookies is essential to help the cookies maintain their embossed design during baking.
- If you don’t have a cookie stamp, you can use the bottom of a clean glass to gently imprint a pattern.
- For coffee lovers, the espresso powder in both the dough and glaze enhances the chocolate flavor beautifully without overpowering.
- Milk for the glaze can be substituted with any nondairy milk, like almond or oat milk, to keep it dairy-free.
- Store cookies in an airtight container to keep them fresh and prevent the glaze from becoming sticky.
- Prep Time: 20 minutes
- Cook Time: 13 minutes
- Category: Dessert
- Method: Baking
- Cuisine: American
Keywords: chocolate espresso cookies, stamped cookies, coffee cookies, chocolate cookies, espresso glaze, stamped cookie recipe


